Tuesday, December 24, 2013

Chocolate Eggnog Cake


I've never been an eggnog guy. The name alone is enough to gross me out. Maybe it's all the "g" sounds. What is nog, exactly? Aren't you just drinking french toast batter? How is that okay?

Doug is a big eggnog fan and was initially bummed about having to give it up when we went vegan. It turns out that there are some pretty good vegan eggnogs out there. There are also some strange ones that taste nothing like eggnog. I used a rice milk variety for this cake and it turned out fine. For drinking, it's a different story. He loves the coconut milk eggnnog, which isn't always easy to find. He's been drinking a soy variety that's just so-so. He took a swig of the kind I used in this cake and said it tasted nothing like eggnog at all. I think you'll be fine no matter what kind you use, honestly. There's so much going on in this cake that the type of "nog" won't be noticeable.


This is a big cake, as you can tell from the frosting ingredients. I originally made a single cake (basically half of each recipe), which just didn't seem right. It's a holiday-themed cake and should really look special, right? I say this in the notes below, but want to reinforce it here: don't skimp on the frosting. This makes much more than you'd think, so really pile it on to that first layer. If you worry about running out and skimp on it, you won't be able to go back later and put the excess in the middle. Throw caution to the wind and really frost that first layer!


Ingredients
For the cake:
2 cups vegan eggnog
2 tsp apple cider vinegar
1 1/2 cups sugar
2/3 cup canola oil
1/2 tsp vanilla extract
1 1/2 tsp rum extract
2 1/2 cups unbleached flour
2/3 cup cocoa powder
1 1/2 tsp baking soda
1 tsp baking powder
1/2 tsp salt
1 1/2 tsp nutmeg

For the frosting:
2/3 cup Earth Balance buttery stick (11 tablespoons), softened
2/3 cup vegetable shortening (I used Earth Balance for this as well)(11 tablespoons), softened
4-4 1/2 cups powdered sugar
6 tbsp vegan eggnog
1/2 tsp rum extract
3/4 tsp nutmeg

Preheat your oven to 350 degrees. Prepare two round cake pans by lining the bottoms with cut-out circles of parchment paper and spraying the bottom and sides of the pans.

Make the cake: Combine the eggnog and vanilla and set aside for a couple of minutes. Combine the eggnog mixture, sugar, oil and extracts in the bowl of a mixer. In a separate bowl, sift or whisk together the flour, cocoa powder, baking soda, baking powder, salt and nutmeg.

With the mixer running, add the dry ingredients to the wet ingredients, a bit at a time to give them time to incorporate. Divide the batter evenly in the cake pans and put them in the oven for 20-25 minutes, or until a cake tester comes out clean.


Set the finished cakes on a wire rack to cool. Try not to accidentally dent the top of the cake like I did.


Make the frosting: Using a mixer, cream the butter and shortening together until they're smooth and well incorporated. Add the powdered sugar a bit at a time (I do a 1/2 cup), allowing time for the mixer to incorporate it. It won't really look like much while you're doing this, but don't panic. Add the eggnog, rum extract and nutmeg and then let the mixer do its thing for 4-5 minutes. It'll start out looking kind of limp and dull, but once it's done, it'll be fluffy and white. Take a taste and see if it needs more nutmeg.


Assemble the cake: Once the cakes are fully cooled, run a butter knife around the edges of the pan and invert it onto a plate. It should come right out, but if it doesn't a gentle, but firm, shake should do the trick. Turn it right side up and frost the first layer.


Be generous with the top of that first layer! I was afraid of running out of frosting and skimped a bit. I ended up having a ton of leftover frosting and middle layer in the cake that was a bit wimpy. Add the top layer and frost it, making sure to fill in gap between the two layers with frosting.


If you're feeling extra fancy, you can slice the rounded top off the bottom layer so the alignment is more professional-looking. I'm not a professional, so I wasn't worried about that. You could also pipe the frosting on and do some cool things with it, or lightly dust the top with nutmeg or colored sugar. The sky's the limit, really.


Monday, December 9, 2013

Mole Chick'n Chili


If you're a chili purist, you might want to look away. My approach to this classic dish would probably be considered apostasy to those who take their chili making seriously. It's not that I don't take it seriously, I do. I just don't have the options that they do. First, no meat (obviously). I usually use the soy beef crumbles in my chili and they're perfect for it. Second, no beans. We're pretty much a bean-free household, so the standard recipe for 3-bean vegetarian chili is not an option. Third, there are all sorts of weird spices and ingredients in it. This happened by accident one time ages ago when I wasn't paying attention and dumped a bunch of cinnamon into the pot instead of cumin. After it cooked a while, I found that I really liked what it did to the chili. After a while, I was adding other things, like chocolate and honey (or, as a vegan, agave nectar). I came to really appreciate the sweeter possibilities of chili.

One final indignity that might cause a chili champion to faint: Until now, I've never written the recipe down. In fact, there really is no recipe. I just wing it and it turns out a little different every time. Maybe there are mushrooms, maybe there aren't. Same thing with bell peppers, ketchup or beer. It just depends on what kind of mood I'm in.


Since I am now writing it down, I'm pulling together some of my best old ideas and some new ones. This is definitely an upgrade from the way I usually do it. I never really use chick'n in my chili, for example. Since this is more of a mole sauce, chick'n is a better fit than the beef crumbles. Gardein's Chicken Scallopini is well-suited for this kind of dish and is pretty easy to find in the freezer section at the store. Once it's browned up and cooked into the chili, it's hard to tell that it's not the real thing.

I can be a wuss when it comes to heat, so feel free to throw in a jalapeno or something with some more kick if this doesn't do it for you. I found it to be plenty hot, but not uncomfortably so.


Ingredients
3 tbsp olive oil, divided
1 large sweet onion, diced
3 cloves garlic, minced
1 yellow bell pepper, diced
1 poblano pepper, diced
1 medium butternut squash, peeled and diced
2 cans fire-roasted diced tomatoes, with juices
2 tbsp chipotle chili powder
1 1/2 tbsp ground cumin
1 tsp dried oregano
1 package of vegan chicken or homemade chicken seitan, and diced
8 ounces dark beer
1 cinnamon stick
3 strips of orange peel (no pith)
1/2 cup dark or semi-sweet vegan chocolate chips (I use Ghiradelli)
guacamole or sliced avocados

In a large pot, heat 2 tbsp of the olive oil over medium heat. Add the onions and cook them for about 3 minutes. Add the garlic, bell pepper and poblano pepper and cook, stirring occasionally, for another 5 minutes or so. Stir in the chili powder, cumin and oregano and cook for another minute or so, until everything is coated in the spices.


Add the squash and stir it around to get it coated as well. Then add the tomatoes, beer, cinnamon stick and orange peel, along with a teaspoon or so of salt and a few good cracks of pepper. Stir it together and put the lid on. Bring it to a boil, then reduce it to a simmer and cook, covered for about 20-25 minutes, or until the squash is tender.


While that's simmering, heat the remaining 1 tbsp of oil in a skillet and add the diced chick'n pieces. Cook it over medium heat, stirring it around until it's browned on all sides. Remove it from the pan and set it aside.


When the squash is tender, stir in the chickn' and cook it for a few minutes. Stir in the chocolate and add some more salt and pepper to taste. Fish out the orange peels and cinnamon stick before serving (or don't. I bit into an orange peel and it was actually kind of nice).


Garnish with a big dollop of guacamole or some avocado slices. Serve with lime wedges, vegan sour cream, tortilla chips, whatever floats your boat.

Thursday, December 5, 2013

Potato and Broccoli Soup with Mock Parmesan


Be advised: I'm going to get a little soup crazy this winter. The weather has now shifted from fall to winter (about 3 weeks early) and it just feels right. I've never been a big soup person, but that seems to be changing for some reason. I started out thinking that this particular soup would be a creamy one, but at the last minute decided against running it through the blender. This was partly because my blender can be a pain to use and partly because chunky veggie soup is kind of underrated. I struggled to get a "pretty" picture of it, but trust me, this is a great soup. It's also easy and has only a handful of ingredients, which is always nice.

The flavor of this soup really depends on caramelizing the onions, so don't rush them or pull them off the heat too early. It's worth the wait.

I used a mock parmesan for this to give it some "oomph" at the end, but also to thicken the broth a bit. This parmesan is really easy to put together and, like real parmesan, goes well on all sorts of dishes. Try it on spaghetti, pizza or anything else you would normally shake a little parmesan over. The look and texture are perfect and the flavor is pretty close as well.


Ingredients

For the soup:
1/4 cup extra virgin olive oil
3 tbsp Earth Balance, divided
1 large sweet onion, julienned (about 2 cups)
3 cloves of garlic, minced
2 cups diced Yukon Gold potatoes, peeled or unpeeled
2 1/2 cups broccoli florets, with little or no stem
3 1/2 cups veggie stock
6 basil leaves, roughly chopped
Sea salt and ground black pepper

For the mock parmesan:
1 cup almond meal
1 tbsp nutritional yeast
1 tbsp white miso paste
1/2 tsp sea salt
1/2 tsp onion powder
1/2 tsp garlic powder


To make the parmesan, combine all the ingredients in a food processor and pulse it 3-4 times. Set 1/2 cup aside and keep the rest refrigerated in a sealed container.


To make the soup, combine the olive oil and half the Earth Balance in a heavy-bottomed pot over medium heat. Once the butter has melted, add the onins and season them with a pinch of salt and pepper. Saute the onions until they become caramelized. This will take some time, so resist the temptation to turn the heat up or to move on before they're really ready. It could be 10-15 minutes, depending on how hot the pot gets.

They'll start like this:


You're looking for this:


When they're about done, add the garlic and cook it until fragrant, about a minute.

Add the potatoes and stir them around to coat. Let them brown up for a couple of minutes and then add the brocolli and do the same thing.


Add the stock and bring it all to a boil. Simmer the soup until the brocolli and poatatoes are tender, about 10-12 minutes. Add the parmesan, the rest of the butter and the basil and stir to combine.


Tuesday, October 15, 2013

Roasted Butternut Curry Soup


Is it just me, or is everything pumpkin flavored right now? I do love pumpkin, but butternut squash will always be my favorite seasonal flavor. You can eat butternut squash pretty much anytime of year these days, but it only really feels right in the fall. It's absolutely perfect for soup because it doesn't need to be gussied up. It's pretty close to perfect as-is.

It's even better when paired with curry and lime. I know it sounds weird, but go with me on this. Throw in some apple cider and you have fall warmth in a bowl.

Ingredients
1 small butternut squash
1 sweet yellow onion, chopped
1 tbsp curry powder
1 tsp ground ginger
1/2 tsp smoked salt
1/2 cup apple cider or good apple juice
1 cup warm water
2 tsp Better Than Boullion veggie paste
1 14 ounce can coconut milk
2 tsp lime juice

Preheat your oven to 400 degrees. Line a baking sheet with parchment paper.

Cut the squash in half lengthwise and scoop out the stringy stuff and the seeds. Brush the cut side with a little olive oil and sprinkle on some salt and pepper. Place both halves cut side down on the baking sheet and put enough water in the sheet to cover the whole surface with 1/2 inch of water. Put the squash in the oven and roast it until browned and soft, about 1 hour. When it's done, a fork should easily pass through the flesh of the squash. Set it aside to cool. It'll look like this:


Add some olive oil to a dutch oven or heavy-bottomed pot and put it over medium heat. Saute the onions until soft, then add the curry, ginger and salt, stirring it around to coat the onions. Add the cider or apple juice, scraping any browned bits from the surface of the pot.


Bring to a boil and simmer until the cider has reduced by half. It'll be much thicker than when you started out.

Remove the onion mixture from the heat and add it to a food processor or blender. Scoop the squash flesh from the rind and add it as well. Puree it all together until smooth, then transfer it back to the pot and put it over low heat.


Dissolve the bouillon in the hot water and add that along with the coconut milk to the pot, stirring to combine.


It'll look like a wreck at first, but don't worry, it'll come together. Turn the heat up and let it simmer for 10 minutes or so, stirring occasionally. Add the lime juice and salt and pepper (if needed).

Wednesday, October 2, 2013

Maple Brown Sugar Pound Cake


It's that time of year, isn't it? Mother Nature flips a switch and fall just starts. It looks feels and even smells like fall here. If you're a fan of summer and in mourning, this cake should help you come to terms with the seasonal changes. No matter what, cake can always save the day.

This isn't an elegant cake, but it's a rich, moist and addictive one, just the same. It's one of those desserts that you can whip up in a pinch when the mood strikes you, because all the ingredients are things that people usually have around the kitchen. The only exception may be maple extract, but that's pretty easy to find at the store. Applesauce is the perfect egg substitute for this and pretty much any other pound cake. An equal amount of mashed banana would work as well.


Ingredients

For the cake:
2 cups unbleached all-purpose flour
2 tsp baking powder
1/4 tsp salt
1/2 cup vegan butter
1 cup firmly packed brown sugar
1/4 cup unsweetened applesauce
1/2 cup soy or almond milk
1 tbsp molasses
1/2 tsp vanilla

For the maple glaze:
1 tbsp soy or almond milk
1/2 tsp vanilla
3/4 tsp maple extract
1 to 1 1/2 cups powdered sugar

Preheat your oven to 325 degrees and lightly grease a 9x5 inch loaf pan.

In a small bowl, combine the flour, baking powder and salt. In the bowl of a mixer, cream together the butter and brown sugar. Add the applesauce, milk, molasses and vanilla and mix well. Incorporate half the dry ingredients into the wet ingredients and mix them until they just come together, then repeat with the other half. Spread the batter evenly into the loaf pan. It will be thick, so don't expect it to just pour out like a lot of other cake batters.


Bake for 45 to 50 minutes, until a cake tester comes out clean. Let it cool in the pan on a rack for 20 minutes or so, then run a knife around the edge and invert it onto a plate. Let it cool completely before glazing.


To make the maple glaze, combine the milk, vanilla and maple extracts in a bowl. Whisk in the sugar a bit at a time until the glaze reaches a smooth consistency.


When the cake has cooled completely, pour the glaze over the top, letting it drizzle down the sides. You can help it along with a rubber spatula if it's not getting there, but there should be enough to get the job done.


I never seem to have any on hand, but you could totally make this extra special by topping it with some chopped walnuts. Slice off a hunk or two and enjoy!

Friday, September 27, 2013

Rosemary Apple Pie


This pie is a showstopper, but not just because it's pretty. It's delicious as well. I've always been a big fan of herbs and fruit together because, if they're done right, they can add another layer of unexpected, savory flavor. Adding rosemary and a bit of cornmeal in the crust accomplishes this quite nicely here.

This pie takes a good amount of time to prepare and make. It tastes like it took forever because it kind of does. I know that goes against my love for simple recipes, but sometimes you have to do more work to get a better result.


Ingredients

For the crust:
2 cups unbleached all-purpose flour, plus more for dusting
1/2 cup evaporated cane sugar
2 tbsp cornmeal
1/2 tbsp chopped rosemary
1 tsp kosher salt
12 tbsp Earth Balance buttery stick, cubed and chilled
1/2 cup ice-cold water

For the filling:
3 lbs of sweet McIntosh apples, peeled, cored and sliced
3/4 cup evaporated cane sugar
3 tbsp cornstarch
1 1/2 tbsp ground cinnamon
1 tbsp fresh lemon juice
1 1/2 tsp vanilla
1/2 tsp kosher salt
3 tbsp Earth Balance buttery stick, cubed and chilled


Make the crust: Put all the ingredients except the water into a food processor and pulse them until the butter has been incorporated and reduced to pea-sized bits. It's important to have very cold butter for this, so what I do is cube up the butter before I start anything else. Then I put it in the freezer while I get the other ingredients together. It's never more than a few minutes, but it firms the butter up nicely. If you have room-temperature butter, it'll cream together with all the other ingredients (think chocolate chip cookie dough) and will be a total mess.

Before:


After:


Add the water through the chute and pulse it continuously until the dough comes together.

Divide the dough into 2/3 and 1/3 portions. Roll them out separately into flat disks and wrap them both in plastic wrap and put them in the fridge for an hour.

Once an hour has passed, on a floured surface, roll out the larger piece of dough into a 12-inch round. Gently roll it over your rolling pin, pick it up and roll it out over your pie pan. Center it so that it hangs over the pie plate evenly on all sides, then trim the excess until there's only about an inch of overhanging dough around the whole diameter of the pan.


Roll the smaller piece of dough out to about 8 inches and slice it into strips. Try to make them relatively similar in width (you can see where I had to re-cut after not getting it quite right). You'll need 8 strips total. Put the strips on a plate and put both doughs in the fridge for another 30 minutes.


Make the filling: While the doughs are chilling, you can peel and slice your apples and then combine them with the cornstarch, cinnamon, lemon juice, vanilla and salt in a large bowl. A few minutes before you assemble the pie, go ahead and cube up the butter. You won't need to put this butter into the freezer or worry about it staying really cold.


Assemble the pie: Once the dough has chilled for 30 minutes, pour the apples into the pie pan, spreading them out evenly. Dot the apples with the butter cubes, tucking some of them into the apple mixture.


Here's the part that seems tricky, but really isn't. Lay four of the dough strips horizontally across the top of the pie, then fold the first and third strips halfway back on top of themselves. Lay another stripe perpendicular to them, just off center.


Unfold the first and third strips and then fold back the second and fourth strips and lay another strip perpendicular to those.


Repeat the weave pattern on the other side until you have the full effect. Put the completed pie into the fridge for 30 minutes.

Preheat your oven to 400 degrees and bake the pie until the crust is golden and the apples are tender, about 1 hour. Let the pie cool completely before serving.


Sunday, September 15, 2013

Okra and Fig Stew with Fresh Corn Polenta


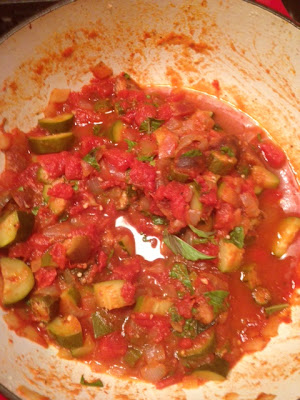
This dish was sort of a happy accident. I knew I wanted okra and zucchini for the stew, but the store had a screamin' deal on organic figs, which intrigued me (I've never cooked with figs). It was a gamble, but it paid off. The figs add a really wonderful element to the flavors of this stew.


This is another one of those versatile dishes. If you don't have one thing, you can certainly throw in something else to substitute. As long as it's in the same neighborhood flavor and consistency-wise, you should be okay. And if it isn't? Well, maybe you'll stumble onto something really great and unexpected. Or maybe you'll learn what not to do next time. I've had plenty of both experiences. Luckily, this is one of those dishes that's hard to screw up, no matter what you end up using.

The corn polenta is really easy and delivers an incredible flavor. In fact, I'll make a confession: the night I made the stew, I served it over rice. It was okay, but something was missing. Luckily, I'd made a ton of it and that gave me a chance to get it right the second time. The next day, I was at the Pike Place Market picking up some spices and saw all this beautiful sweet corn at one of the stalls. I'd always wanted to try making polenta from corn rather than cornmeal and this was an excellent opportunity to do so.

When we ate this the next night as a stew-and-polenta dinner, everything had changed. The polenta brought it all to life in a way rice never could. This approach to polenta is easier than the traditional way (none of that constant stirring), so give it a try. You won't regret it!


Ingredients

For the stew:
1 sweet onion, chopped
1 cup of okra, stemmed and sliced
2 zucchini, sliced
5 figs, quartered
1 can of diced tomatoes
6 basil leaves, chopped or torn

For the polenta:
5 ears of sweet corn
2 tbsp vegan butter
1 tbsp nutritional yeast
1 clove garlic, minced

Make the stew: In a large, heavy-bottomed pot, heat a little olive oil. Drop in the onions and cook over medium-high heat until translucent. Add the zucchini and stir it around, letting them cook for about 3-4 minutes. Add the figs and cook for another minute or so.


Add the tomatoes and basil and stir to incorporate them. Throw in a little salt and pepper and then bring it all to a boil. Once it gets going, reduce the heat and allow it to simmer, uncovered, for about 30 minutes, stirring occasionally.


In a skillet, heat a little olive oil over medium heat and add the okra. Stir it around so that it browns evenly on both sides, about 5 minutes. Add the okra to the stew in the final 10 minutes of cooking time. It'll get soft and gummy if you do it sooner.

Make the polenta: Remove the leaves and silk from the corn, then stand each ear up on end and slice down the sides with a sharp knife to remove the kernels. I do this in the pot I'll be cooking them in, so when the kernels go flying, they stay in the pot and don't end up on the counter or the floor.

Once your kernels are removed, put just enough water in the pot to cover them. Bring the water to a boil and then reduce the heat. You want these to simmer gently for about 10-12 minutes.


Once they're ready, remove them with a slotted spoon or pour them through a fine-mesh strainer, reserving the cooking water. Put the corn into a food processor and let it run for a while to really break down the corn, checking it periodically and pushing down the sides, if necessary. It will be pretty thick, but it's supposed to be. If you need to loosen it up, use a little of the cooking water. Go sparingly with it, though. If you get it too liquid-y, there's no getting it back to the proper consistency.

Put the corn back into the pot and stir in the butter, garlic and nutritional yeast. It should look like a chunky polenta.


If you cook this while the stew is simmering, it should all be ready around the same time.  Spoon some of the polenta on a plate and top it with a ladle of stew. Top it with a few fresh basil leaves and you're ready to dig in.

Monday, August 26, 2013

Strawberry Gazpacho with Cilantro-Lime Sour Cream


Gazpacho has been very "in" for the past few years, mostly watermelon. This year, strawberry is in the top spot, which makes me happy because it's my all-time favorite fruit.

This soup is really easy to make, but has the kind of complex flavors that will make people think it took forever. It works well as a starter course, or can be a light entree with some warm, crusty bread.

If you've never chopped a mango before, don't worry. It's not nearly as complicated as people make it out to be. The key is to use a really sharp knife. First, don't peel the mango. Let your knife slide in from the top and feel for the core by gauging the resistance as you slowly slice downward. It should meet little-to-no resistance. If your knife is slowed down, back up a bit and move slightly outward until it's easy to slice again.

Once you're done, you should have thick slices of mango on the peel. Cut those into cubes and then slice or gently pull them off.


Ingredients
2 lb. strawberries, hulled and sliced (about 5 cups)
1 small mango, chopped (about 1 cup)
1/2 cup chopped red bell pepper
1 large shallot, chopped
2 tbsp olive oil
1/4 cup chopped cilantro, divided
1/4 cup lime juice, divided
4 tsp agave nectar, divided
1/2 cup vegan sour cream

Chop all your fruits and veggies and combine them in a bowl. Try your best not to just eat it at this point. It'd make a delicious and funky little salad.


Put it all into a blender with the oil, 2 tbsp of the cilantro, 2 tbsp of the lime juice and 3 tsp of the agave. The blender will be very full, but don't worry, it'll all fit and will easily combine after about 30 seconds or so.

Before:


After:


Stir the sour cream with the remaining cilantro, lime juice and agave. At this point, it's ready. You can do this well ahead of time and put it all in the fridge until you're ready. Ladle the soup into the bowls and pour a spoonful of the sour cream in the center.