Wednesday, July 31, 2013

Beer Battered Tofu "Fish" and Chips


I've heard it a million times: "I don't like tofu. It doesn't taste like anything!" I understand that sentiment because I used to say it myself. I thought tofu was just for stir fry and not much else. After we gave up meat, I realized that I now had to cook with this stuff. What could I do with it?

It didn't take long to see the possibilities. There are a ton of fun and interesting recipes out there that put tofu in all sorts of starring roles. And because it takes on the flavors of marinades and sauces, tofu is a great culinary chameleon.

If you're missing beer battered fish and chips, this should satisfy your cravings. Extra-firm tofu holds up extremely well to being battered and fried. I like to let it soak up some soy sauce beforehand to give it a little flavor. The saltiness works really well with the creamy texture of the tofu and the crunch of the breading. Make sure to use a dark beer for this. The darker the beer, the better the flavor. You don't need anything fancy, though. I used Guinness this time around and it was perfect.

You can cut your tofu into whatever shape you like. I'm a fish sticks kind of guy, but if you're more of a Long John Silvers fan, go for some triangle wedges instead. You could also do little tofu poppers by cutting them into one-inch pieces.


Ingredients
1 lb extra firm tofu, drained and pressed
3 tbsp tamari or soy sauce
1 cup unbleached flour
1 tbsp cornstarch
1/4 tsp baking powder
1/2 cup cold dark beer
1/2 cup cold water
Vegetable oil for frying.

Prepare the tofu: After draining and pressing the tofu, stand it up on its side and slice it in half down the center of the side, making two thinner blocks. Set both sides down flat and slice it across the middle. Then slice it lengthwise so that you have thin "sticks" of tofu. Put the tamari or soy sauce in a glass dish and soak the tofu in it, turning it occasionally to soak up the sauce.


At this point, you can get your pan of oil ready for frying. Use a large, heavy-bottomed pot with about a half inch of oil in it. Preheat it over medium heat.

Make the batter: In a medium bowl, combine the flour, cornstarch and baking powder. Make a well in the center and pour in the beer and water. Whisk it together until a thick, smooth batter forms.


If you're wondering whether your oil is ready, drop a little batter in and see what happens. If it bubbles rapidly, it's ready. It should be around 325 or 350 degrees.

Working in batches, drop a few tofu pieces into the batter and move them around to coat. They'll hold the batter without it slipping off.


Gently lay them into the oil and let them fry up for about 3 minutes on one side and two on the other. They'll start to get puffy and golden.


When they're done, remove the pieces and place them on a plate lined with paper towels. If you're not serving them immediately, you can put them in an oven preset on the warm setting, or at 200 degrees. Serve them with fries and some vegan tartar or malt vinegar, if that's your thing.

Friday, July 26, 2013

Whoopie Pies


Some people like to read or watch TV when they're bored. The really good ones clean the house or work on long-postponed projects. Me? I bake. We aren't exactly having what you'd call baking weather here in Seattle, but the idea of having a pie or a cake or cookies is too powerful to resist. The idea of having whoopie pie, even more so. So when there was nothing else to do the other night, I decided to bake whoopie (sorry, couldn't resist). I'm rather proud of these, as the flavor is pretty much right on. If you're a vegan who misses whoopies, this recipe is just what the doctor ordered.

Whoopie pies are an Amish creation, so it's not totally true that they don't have a decadent streak. Pennsylvania, New Hampshire and Maine all loudly proclaim that they are the official home of the whoopie pie. Maine even went so far as to codify in law that the whoopie pie was their official state treat (they already had an official state pie and didn't want to rock the boat, I guess).

The "cookie" part of this is more cake-like, which is why it has more ingredients than normal cookies. That also means they'll expand and spread quite a bit while baking. I hadn't thought about that and put 2 1/2 to 3 tablespoons of dough onto the baking sheet before popping them into the oven. The result was a giant whoopie pie, just a bit smaller in diameter than a McDonald's cheeseburger. They're filling, so you may want to dial the size back a bit, especially if you want more pies out of a batch (this made about six). You can make little mini whoopie pies with no more than a tablespoon of dough for each cookie.

Ingredients

For the cookies:
1 cup soy milk
1 tsp apple cider vinegar
1 cup whole wheat pastry flour
1 cup unbleached all-purpose flour
1/2 cup Dutch process cocoa powder
1 tsp baking powder
1 tsp baking soda
1 tsp salt
1/2 cup Earth Balance butter, softened
1/4 cup evaporated cane sugar
1/2 cup dark brown sugar
2 tbsp vegan sour cream
1 tsp vanilla extract

For the filling:
2 cups powdered sugar
1/3 cup vegetable shortening, softened
3 tbsp soy milk
1 tsp vanilla extract

Preheat your oven to 350 degrees and line two baking sheets with parchment paper.

Make the cookies: In a small bowl, whisk together the soy milk and vinegar and set aside for a few minutes. In a medium bowl, combine the flours, cocoa, baking powder, baking soda and salt.

Using a stand mixer or hand mixer, cream together the butter and both sugars, making sure they're completely combined and creamy. Mix in the sour cream.


Stir your soy milk mixture (it should be thicker now) and add the vanilla. Beginning with the wetingredients, add both wet and dry to the butter/sugar mixture with the mixer running, scraping down the sides as necessary. Beat everything together at a medium speed until it's just combined.


Scoop out balls of dough onto the prepared baking sheets. You can do 1 or 2 tablespoons for each, depending on how big you want them to be. Give them at least 2 inches of space in between as they will spread quite a bit.


Bake them for about 10-12 minutes, until they've flattened out and crackled a bit on top.


Make the creme filling: Start with the mixer on low and beat the powdered sugar and shortening together. Add the soy milk and vanilla and continue on low until they are incorporated. The filling will be sort of limp and dull-colored at this point, but don't panic.


After the ingredients are all incorporated, throw the mixer into high gear and let it whip the filling for 2-3 minutes. It will turn fluffy and bright white.


To assemble the pies, choose two cookies that are similar in diameter. Turn on over so the flat side is up and drop a healthy dollop of creme filling on it. Press the other cookie down on it, pushing the filling out to the edges. These will keep in an airtight container for a few days, but they probably won't be around that long.

Friday, July 19, 2013

Grilled Polenta Cakes with Chunky Summer Veggie Sauce


I've been feeling guilty about not posting as frequently lately. It's not like I don't have things to share, it's that I've just had some crash-and-burn recipe experiences this week that have derailed my ambitions. Last Saturday, I went to a cooking class at Sutra, one of our favorite vegan restaurants in town, and came away from it inspired and excited to make the dish we prepared in class. After flubbing Sutra's surefire recipe for coconut whipped cream (which has been the Moby Dick to my Captain Ahab for quite a while now) and letting some pecan cheese ferment a bit too long (gross), I decided to regroup and get back to familiar territory for the time being. I will be sharing those dishes and more from the class soon, I just need to refine and tinker and learn first.

If you want to see how it's done firsthand, I cannot recommend Sutra highly enough. It's an incredible culinary journey, one that should be taken from a seat at the counter, so you can watch the production and chat with the chefs. The menu looks overwhelming, but the flavors work together better than you could imagine.

I wouldn't call this dish a consolation prize, because it turned out to be quite delicious in its own right. Polenta cakes are probably one of the easiest comfort foods around, and you can do a lot of different things with them (Candle 79 makes them into fries for their burgers). A lot of vegan polenta cake recipes use plain old water, but you should always use a good, flavorful stock instead. I use Better Than Boullion, which is a concentrated stock that you make at home. It has 10 times the flavor of a boxed or cubed stock, and offers a variety of vegan flavors. The straight-up veggie is my favorite.

I've read some stuff  about polenta vs. traditional cornmeal, and I don't really get the distinction. One is a little finer than the other, but that's about it. A more fine or medium grind is probably best for this, but you can use whatever you have on hand. Polenta is pretty inexpensive, so I go with that.


The sauce is more of a ragout, and you can use whatever chunky summer veggies you'd like. If you've got a garden, this is an excellent way to use up some of your summer bounty. You can swap rosemary or another fragrant spice for the oregano/thyme combination. It's a sturdy sauce, so changing up the flavors and getting creative won't do any damage.

Ingredients

Polenta Cakes:
1 cup polenta
4 cups of veggie broth
1 garlic clove, minced
3 tbsp nutritional yeast
2 tsp Earth Balance
1/2 tsp salt

Sauce:
3 tbsp olive oil
1 red onion, chopped
2 cloves of garlic, minced
1 yellow squash, sliced
1 zucchini, sliced
1 small eggplant, diced
1 can of diced tomatoes
1/2 can of tomato paste
1 small jar kalamata olives, pitted and sliced
2 tsp oregano
1 tsp thyme
1 tbsp chopped basil, plus more to finish with
salt and pepper to taste

Make the polenta cakes: Bring the broth to a boil. If you're using Better Than Boullion, boil the water first and then add the boullion to it, then bring it back to a boil. Pour in the polenta, stirring while you do it. Turn the heat down to a simmer and stir frequently. Make sure to scrape along the bottom of the  pot to keep it from sticking and burning. After about 15 minutes, it'll start to thicken up. You're looking for it to start pulling away from the sides of the pot when you stir it. Once you have that consistency (and there are no lumps), remove it from the heat and stir in the remaining ingredients.


 Spray a glass baking dish with cooking spray (I used a loaf pan, but you can use an 8x8 1/2 square dish as well) and pour the polenta in. Spread it around evenly on top and put it into the fridge to cool down and set up. It should be ready in 20-30 minutes, which is enough time to get the sauce ready.


Make the sauce: Put the oil into a skillet over medium heat and add the onion. I didn't dice this onion because I wanted a chunkier texture. Instead, I cut it into small wedges or strips. You can do it any way you like, though. Cook the onion until it starts to soften, then add the garlic and stir it around for a minute or so. Add the other veggies and toss them around. Cook them for 3-5 minutes, stirring occasionally. They should start to brown up a little and the eggplant should start to get kind of soft.

 
At that point, add the olives, oregano, thyme, diced tomatoes and tomato past and incorporate it all together. Turn the heat down a bit, cover it and let it simmer for a few minutes. Add the pepper and salt to taste at this point. Remember that the olives are pretty salty, so take a taste before adding the salt. This will be a pretty chunky sauce, so the goal isn't to break everything down, but to coat the veggies and get all the flavors together. Once that's done, remove it from the heat and cover it.

Take the polenta out of the fridge. It should be set up and solid, so that you can slice of a piece of it without it running through the cut (sort of like slicing off a hunk of pound cake). They don't need to look perfect when you slice them, and some of them may lose a corner in the process. No biggie. Remember, these will be covered with sauce. They'll also be devoured before anyone really notices.

You can put these on your grill or fry them up in a skillet over medium-high heat (I cheated and used my grill pan). Brush both sides with a little oil before you put them on the heat.


After a couple of minutes, they should start to brown up a bit or leave grill marks, which is when you'll know they're ready to flip. Once both sides are browned, you're done. They'll be a little crispy on the outside, which is what you want.


Put two of the polenta cakes on a plate and top them with the sauce. Top it with some more fresh basil and dig in.

Tuesday, July 9, 2013

Soba Noodle Salad


Some nights I'm in the mood for a big production number for dinner. The night I made this, I was feeling pretty much the opposite. It's made up of stuff I had around and needed to use up, but don't let that fool you. This incredibly simple and fresh dish had us coming back for more. It's perfect for a summer night or even a nice light lunch. The leftovers are also great because it's all had a chance to really marinate in the dressing. You can definitely throw this together and put it in the fridge for later and feel fine about it.

I used thinner stalks of asparagus for this. Normally, I prefer the fatter asparagus, but the dainty ones are just right. You can also switch things up with the veggies and subsitute those little miniature ears of corn for the broccoli, or chopped bell peppers for the asparagus or fava beans for the edamame instead. These three were what I just happened to have on hand and needed to use up. The carrot really brightens things up, as usual.


Soba noodles are hearty Japanese buckwheat noodles that are pretty easy to find in the Asian food section of most grocery stores. Whole wheat spaghetti would be a find substitute in a pinch, though. I'd snap the spaghetti noodles in half before boiling them to keep them to a manageable size (you shouldn't have to do a lot of fork twirling).

Ingredients

For the salad:
1 cup shelled edamame
1 1/2 cups asparagus, chopped into 1 1/2 inch pieces
1 1/2 cups chopped broccoli
10 ounces buckwheat soba noodles
1 cup shredded carrot
4 green onions, chopped

For the dressing:
6 tbsp rice vinegar
1 tbsp maple syrup or agave nectar
2 tbsp oil (sesame if you have it)
1 garlic clove, minced
1 tsp minced ginger
1 1/2 tbsp tamari (or soy sauce)
1 tbsp lime juice


Whisk all the dressing ingredients together and set aside.

Fit a pot of water with a steamer or a collander and put the edamame, broccoli and asparagus in. Bring the water to a boil and cover. Steam it for up to 4 minutes, until the broccoli is just tender, then remove it from the heat and run it under some cold water to preserve the crunch of the veggies. Pour them into a large bowl and set aside.


Bring a pot of salted water to a boil. Cook the soba noodles for about 4 minutes, then run them under cold water. Drain them really well and add them to the bowl with the veggies. Give it all a good toss. Add the carrots and green onions and toss it all together again.

Mix in half of the dressing and let it set for 10-15 minutes. Give it another toss and then serve. You can also put it in the fridge to serve it later. Whenever you serve it, add more dressing as desired.

Friday, July 5, 2013

Orange-Vanilla and Chocolate-Chili Creamsicles

.

Right after my first popsicle post, Seattle's summer weather stopped being polite and started getting real. The house was like a convection oven for a solid week, and we resorted to sleeping out on the deck for a couple of nights to escape it.

That kind of weather called for more popsicles. The fruity popsicles are fun, but what every vegan really misses is a good creamsicle. I'm a big fan of interesting, unconventional ice cream flavors. When it comes to popsicles, I tend to want to keep it relatively straightforward. You don't have a lot of time to enjoy a popsicle before it starts to become a messy game of beat the clock, so it makes sense to leave the more complex flavors to a bowl, where they can be savored more leisurely.

These take even less time than the strawberry and peach popsicles because there's no chopping or blending involved. The chocolate flavor needs to be cooked just a bit to smooth everything out. I'm only recently coming around to the whole chocolate-chili combination, and I'm a big wuss when it comes to heat. I found this amount of chili powder to be just right. You don't really taste it, but you do feel it. It was a bit hotter than I usually like it, but it worked well with this. If you're a big fan of hot chili and chocolate, feel free to bump it up a bit. If you have some left over, you can make it into pudding by refrigerating it for a bit so it sets up.


Ingredients

Orange-Vanilla:
2/3 cup soy or almond milk
1 1/3 cups orange juice
3 tbsp sugar
1/2 tsp vanilla extract

Chocolate-Chili:
2 cups soy or almond milk
6 ounces of chopped dark chocolate (I used Ghirardelli)
3 tbsp sugar
1 tbsp cocoa powder
1/4 tsp chili powder
1/2 tsp vanilla extract

For the orange flavor, just combine all the ingredients in a bowl and stir until the sugar is dissolved.

For the chocolate flavor, combine all the ingredients except the vanilla in a saucepan and cook over medium heat, whisking frequently until the chocolate has melted and everything is smooth. Stir in the vanilla and remove from the heat. Let it cool a bit.


Pour both flavors into the molds, put the caps on and let them freeze for about 8 hours or so.


To unmold, just run warm water over the mold and lightly wiggle the handle until the popsicle comes out.


Tuesday, June 25, 2013

Strawberry-Basil and Peach-Ginger Popsicles


Despite Seattle's meteorological mood swings (from sunny heat to chilly rain, sometimes all in the same day), summer is here. That means it's popsicle season. Before you point it out to me, I know this isn't really "cooking," but these are easy and delicious, perfect for a summer day. Besides, "What's Jim Freezing?" is not nearly as catchy a blog title.

I love making popsicles at home. It's really easy, and you know what you're eating. I have fond childhood memories of Otter Pops, but when I tried one last summer it wasn't the same. The neon colors and sickly sweet, corn-syrupy flavor? It'd be nice to have a fruit-flavored treat that actually had some fruit in it. We can do better.

The other upside to making your own is that you can combine just about any flavors you want. Sweet, savory or a mix of the two. The world is your oyster (let's not make oyster popsicles, though).
I have a feeling I'll be whipping up all kinds of popsicles this summer, but I wanted to start with something basic. Peach and strawberry. The ginger and basil play well off these two and make the flavors a little more interesting and complex. Feel free to play around with them and make your own up (basil and peaches could be interesting).

If you don't already have them, I'd recommend getting some popsicle molds for this. You can buy them at just about any supermarket in the summertime, but you really can't beat the selection online. There are all sorts of shapes and sizes to choose from.

Ingredients

Strawberry:
2 cups hulled and quartered strawberries
3 tbsp evaporated cane sugar*
2 tsp lemon juice
2 tbsp of chopped basil
1/8 cup water (maybe more)

Peach:
2 cups chopped peaches (peeled or not)
3 tbsp evaporated cane sugar*
2 tsp lemon juice
a pinch of ginger
1/8 cup water (maybe more)

*I've been getting some questions about what evaporated cane sugar is, and where to find it. It's basically just unrefined sugar. It's a little more crystal-like and has a light amber color. You can sometimes find it in bags on the shelf near the regular sugar, but the stuff I use is in the bulk section of the supermarket, next to the flours and oats and stuff. It's usually around $1.50 a pound. I took us off the processed sugar about a year ago, so that's why it appears in my recipes instead of plain old sugar. Of course, you can use the plain old sugar if you don't have any of the cane sugar. It's a 1-1 swap for the processed stuff, so the substitution is really easy.

Put everything in the blender and process until smooth. You may need a little more water, depending on the consistency you want, but I found 1/8 cup to be just right. Here's a view down into my blender:


Pour the mixture into popsicle molds and put the caps on tight. Put them into the freezer and freeze for at least 8 hours.


If you don't have popsicle molds, just pour the mixture into paper cups and put them into the freezer. After an hour, they'll be frozen enough to allow a stick to stand upright. Put the stick in and let it freeze as normal.

To unmold, run the molds under some cool water and jiggle the handle a bit. The popsicles will slide right out. Lick 'til your heart's content!

Sunday, June 16, 2013

Sweet Potato Empanadas with Braised Collard Greens


I realize that posting this recipe now makes no real sense. I've just been raving about summer and how much I love it and now I'm posting a recipe that has a bit of a fall feel to it. Sweet potatoes, walnuts and apples? I might as well serve up hot cider and carve pumpkins, too. My only saving grace is the fact that sweet potatoes are becoming a year-round thing in the market, which is good, because they're hard not to love. Plus, they pack in loads more nutrition and vitamins than conventional potatoes.

The truth is, I couldn't have waited to make this even if I'd wanted to. Ever since the last time I made it, I've been thinking about it. I love just about anything baked in dough, but the spicy sweetness of this filling is a really good contrast to the earthy, slightly salty crust. The collard greens are in line with my basic kitchen philosophy on greens: simpler is better.

This recipe uses masa harina, which is a flour made from nixtamal, corn meal that has been leached in lye and then dried and ground. It's got a delicious, unique and penetrating flavor. Even the smallest amount can enhance a dish. It's a staple ingredient for tamale recipes and I like to put it in my onion ring flour to give them an extra crunch. You should be able to find it in a well-stocked grocery store or Latin food store. My go-to brand for any specialty flour is Bob's Red Mill. I like to support them because they treat their employees really well.

You can soften up your sweet potatoes a couple of different ways. You can bake them, though that may run about an hour, depending on their size. I didn't have that kind of time, so I washed them, wrapped them in a paper towel and microwaved them for about 9 minutes, turning them over about halfway through. If you boil them, just throw them into a hot oven for 5 minutes or so to get rid of the excess moisture.

Ingredients

For the empanada dough:
1 1/2 cup unbleached all-purpose flour
1/2 cup masa harina
1/4 cup Earth Balance, softened
1/4 cup vegetable oil
1 1/2 tsp baking powder
1 tsp salt
1/2 cup ice water

For the empanada filling:
3 small sweet potatoes, baked or microwaved until tender
1/3 cup diced shallots
1/3 cup diced apple
1 1/2 tsp curry powder
1 tsp ground cumin
2 1/2 tbsp chopped walnuts

For the collard greens:
2 bunches of collard greens, stems trimmed, washed and chopped into 1-inch strips
1 sweet onion, diced
2 tbsp Earth Balance
2 tbsp vegetable oil
2 garlic cloves, minced
Red pepper flakes, to taste

Preheat oven to 300 degrees.

Make the collard greens: Put a Dutch oven over medium high heat and add the oil and butter. Once it's melted, add the onion and cook it until soft. Add the garlic and red pepper flakes and cook another minute until the garlic is fragrant. Add the greens and toss them until they're coated. Put the top on the pot and put it in the oven. Let it cook for an hour, stirring the collard greens 2 or 3 times while they cook. When they're done, they'll look like this:


Make the empanada dough: Combine the flour, masa, salt and baking powder in a medium bowl. Add the butter and oil and stir it all together with a wooden spoon. It should be very dry and crumbly.


Add the water and stir it until the dough comes together. Kneed it until it's smooth, then let it rest for 20 minutes.


Make the filling: Cut the softened sweet potatoes in half and scoop the flesh out into a bowl. Discard the skins. Heat a bit of oil in a small skillet over medium heat and add the shallots. Saute them until tender and then add the apple, cumin and curry and stir them around to coat. Saute until fragrant, about 4 minutes or so.


Add the shallot/apple mixture and the walnuts to the sweet potatoes and stir them around until the potatoes are mashed and everything is incorporated.


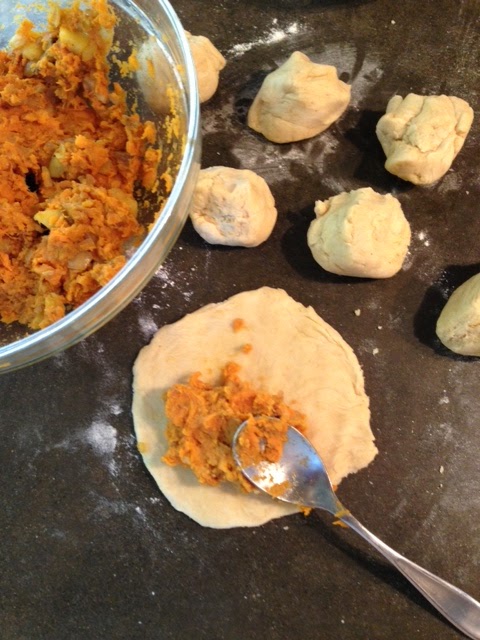
Assemble the empanadas: Cut the dough into 8 equal parts. I did this by just cutting the ball of dough into quarters and then cutting those segments in two. Using a little flour for dusting, take the balls of dough one at a time and flatten them out into a disk. You can use a rolling pin, but I just used a fist and pushed it out with my knuckles. They don't need to be perfect circles, but get as close as you can.


Spoon the filling onto the lower half of the circle, leaving 1/4 inch or so around the edge of the circle.


Fold the top over and press the edges together with the prongs of a fork. Repeat with the others and put them all on a lined baking sheet. Brush them with some melted butter. Again, they don't have to be perfect, so don't worry about making them any exact diameter or anything. After the first few, you should have a hang of it. Some will be bigger than others, which is great for a group with varying appetites. Besides, empanadas should look a little imperfect and rather rustic.


Your collard greens should be close to done by now. Once they are, take the pot out of the oven and set it aside. They will stay hot for a long time in that Dutch oven, so don't worry about them going cold.

Bump the temperature up to 400 degrees and put your empanadas in. Bake them for 20 minutes, until they're golden brown. The smell will be incredible. Plate them up with some collards and some dirty rice and enjoy.