Saturday, January 24, 2015

Chipotle Sweet Potato Soup with Corn Cakes


This recipe came out of some experimentation from the last time I made a sweet potato soup. I'm a wuss when it comes to heat, but if it's smoky heat, I find it a lot more tolerable. I went a little too hot last time around and found myself thinking about it after the fact, wondering what I could have done to counter it a little. I think the answer is to add some sweetness.

I've already raved about Bee Free Honee here. If you haven't tried it, you really should. It's at a few local stores and available online as well. If you can't get your hands on some, feel free to use agave or maple syrup to add that sweetness.

Ingredients
For the soup:
2 tbsp Earth Balance
1 medium onion, diced
2 garlic cloves, minced
3 medium-sized sweet potatoes, peeled and chopped
4 cups veggie broth
1/2 cup Bee Free Honee, agave nectar or maple syrup
1 tbsp chipotle chili powder
Salt and pepper, to taste

For the corn cakes:
1 1/2 cups masa harina
1/2 cup unbleached all-purpose flour
1 tsp baking powder
1/2 tsp kosher salt
1/4 cup nutritional yeast
3/4 to 1 cup of warm water
1 cup corn kernels, fresh or defrosted, if frozen (optional)
veggie oil (for frying)

Make the soup: In a large pot over medium heat, melt the Earth Balance and cook the onions for 5 minutes, or until translucent. Add the garlic and cook for another minute. Turn the heat up to high, add the sweet potatoes and stock and bring it to a boil. Lower the heat to medium and simmer for about 30 minutes. You can use this time to make the corn cakes.


When the potatoes are soft, pour the potatoes and stock into a blender (you may have to work in batches) and blend until smooth.


Return the soup back to the pot and add the chipotle powder, honee and salt/pepper and mix them in. Keep it covered to hold in the heat until you're ready to serve. Ladle it into bowls and top with a little vegan creme fraiche or sour cream.


Make the corn cakes: In a medium bowl, mix together the masa harina, flour, baking powder, salt, nutritional yeast and corn (if using). Add the water, 1/4 cup at a time, stirring until you get a nice dough.

Cut the ball of dough into wedges and shape them into patties. I did five of these, but next time I'll do six. These were a little thicker than I intended.


In a skillet, heat a thin layer of oil over medium-high heat and start frying the corn cakes.  Flip them after about 3 minutes, when they're nicely browned.


Set them on a plate lined with a paper towel once they're done cooking. Serve with a pat of Earth Balance along with a bowl of the soup. Here it is all together, with a little homemade creme fraiche on the soup. Enjoy!


Saturday, January 17, 2015

Salted Caramel Apple Pie


I go back and forth about which fruit pie is the best. For me, it comes down to apple, peach and strawberry rhubarb. If I could make a pie with all of them I would. it'd be a huge pie, but it would be a great one. 

This apple pie is pretty decadent. I love what pears bring to apple dishes, so they're here in equal measure. You only need two of each, so it's not like you'll be peeling and chopping all day.


 Salted caramel puts this over the top, for sure. Apples and caramel go together like...shoot. All I can think of is apples and caramel. You get the point. The important thing is to be careful when making caramel. I outline that down below, but I can't stress it enough. Don't touch it!

This recipe calls for vegan cream. Does such a thing exist? Yes, in a few variations. Sometimes I make my own with soy milk and coconut oil in the blender. For a recipe like this where you only need a little, I use vegan creamers that you can get a most grocery stores. They have soy, almond and coconut. I used soy for this:


Ingredients
For the crust:
1 1/4 cups unbleached all-purpose flour
1/4 cup almond meal
1/4 cup evaporated cane sugar
1/2 tsp kosher salt
6 tbsp Earth Balance, cut into cubes and kept cold
2-3 tbsp ice water

For the salted caramel:
1/2 cup evaporated cane sugar
2 tbsp Earth Balance
1 tsp kosher salt
3 tbsp vegan cream

For the filling:
2 apples (sweeter is better here. I used Golden Delicious), peeled, cored and sliced
2 Bartlett pears, peeled, cored and sliced
1 tbsp unbleached all-purpose flour
1/4 tsp ground cardamom
1/4 tsp ground cinammon
pinch of salt
1 tbsp Earth Balance, cut into small cubes

Make the crust: Combine the dry ingredients in the bowl of a food processor. Add the cold, cubed Earth Balance. If you don't have a food processor, use a large mixing bowl and a pastry cutter instead.


 Pulse or cut the cubed Earth Balance until it's the size of small peas. Run the food processor and stream the cold water through the chute. You'll probably need about 2.5-3 tablespoons of water in the end, but start with 2 and see where it gets you. There will be a little loose flour in the bottom that you can work into the dough after it comes out. You're looking for it to come together like this:


 Dump it out onto a floured countertop and work it over a bit until you have this:


Cut the dough in half. Wrap one half in plastic wrap and put it into the fridge. Roll the other half out flat and wide enough that you can put your tart or pie pan on top of it and still have plenty of overlap on all sides.

Roll the dough up onto your rolling pin, set it down over the tart or pie pan and unroll it. If you're using a regular pie pan, cut off all but about 1/2 inch of the excess dough and then roll and crimp it on all sides. With a tart pan, it's even easier. Just roll it over the top and push the down down into the corners of the pan. Then roll the pin over the top, cutting off the excess: 


Put the pan with the dough into the fridge until you're ready to assemble your pie.

Make the salted caramel sauce: Put the sugar, Earth Balance and salt in a small saucepan with 2 tablespoons of water. Heat them over medium-high heat until the butter melts and the sugar dissolves. Caramel takes time and needs to be watched closely, so clear your schedule for this. You can do other stuff (I peeled the apples and pears), but don't wander too far away. It'll start bubbling, which is when you want to turn the heat down to medium-low.

This is important: DO NOT STIR this caramel. Instead, gently tilt your pan this way and that and let it all swirl around. You don't have to do this constantly, but do it every couple of minutes. It should be bubbling slightly. Also, be REALLY careful not to get it on your skin. Boiling sugar can cause serious burns, so be very deliberate in your movements with it at this stage.

It'll take about 20 minutes to get it where you want it. You'll know it's ready when it's got a golden caramel color. The bubbles may make it hard to see initially, but just swirl it around until you can see the color.

Remove the pot from the burner, stand back a bit and pour in the vegan cream. The caramel will sputter and may spit a bit, so be careful.

At this point, you're going to think you ruined it. The cream will be much colder than the sugar and will cause some of the sugar to crystallize and separate. Don't worry! Put it back on the burner over low heat and things will smooth out again. Now you can stir it, so get in there with a spoon and get everything all combined and smoothed out. You'll end up with a smooth, creamy and buttery caramel sauce. Resist the temptation to stick your finger in and taste it, though. It's still super hot.

Assemble the pie: Preheat the oven to 400 degrees and put a foil-lined sheet pan in there. In a large bowl, combine the apples, pears, flour, salt, cardamom and cinnamon. Pull your tart shell out of the fridge and fill it with the apples and pears. Pour the caramel sauce all over it.


Now take out that other half of the dough. Roll it out flat, like you did with the first half, and cut the dough into thin strips. Lay the strips across the top of the apple/pear mixture.

If you want to do the fancy over/under lattice on this pie, you can see how to do that here. This time I just laid the second layer of strips down at a 45-degree angle. It looks just as fancy, but it's a lot less work. Dot the holes in the lattice with the cubed butter.

You can finish the pie any number of ways. I brushed a little more of that vegan cream onto the lattice and sprinkled a little more sugar onto it. I think you're supposed to use fancy sugar, but it turned out fine this way.

Carefully place the pie onto the heated sheet pan and cook for 40-45 minutes. Once it's done, let it cool for 30-45 minutes before digging in.


Sunday, January 11, 2015

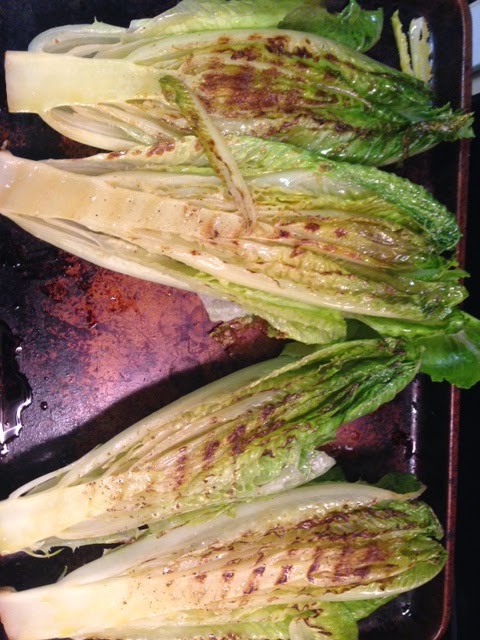
Grilled Romaine Caesar Salad


How are your New Year's resolutions coming along? I resolved to do two things: read more and eat more salad. I've just never been a salad person, for some reason. Caesar Salad is about the only kind I really enjoyed growing up. It's the simplicity of it, I guess. Not a lot of bells and whistles. Caesar dressing is somehow more decadent than the others, so it had that going for it. The abundance of croutons didn't hurt, either.

This is a little more in line with the traditional Caesar than my other salad, which has a lot more going on. It's also much simpler to make. You can prepare the dressing and the croutons well in advance for a really quick dinner, but even if you do it all on the same night, it doesn't take long at all. The result is pretty and delicious. You can serve it as a meal unto itself (as it's pictured above) or do one half as a first course.


Ingredients
For the salad:
2 hearts of romaine lettuce
1 package vegan chicken 
1/2 cup chopped green olives
1 round loaf sourdough bread
2 tbsp Earth Balance, melted
1/2 tsp garlic powder
3 green onions, chopped
Olive oil for brushing

For the salad dressing:
1 1/2 cup vegan mayo (Vegenaise or Just Mayo are great for this)
1/3 cup water
1/3 cup chopped green olives
1 tbsp lemon juice
1 tbsp white miso
1 tbsp nutritional yeast
1 garlic clove, minced
2 tsp dijon mustard
1 tsp tamari
salt and pepper to taste, but only after blending

Make the dressing: Put all the ingredients into a blender and process until smooth. Add pepper to taste and salt if it needs it (the olives will have added a salty flavor already). Pour it into a bowl or container and refrigerate until needed.

Make the croutons: Preheat the oven to 350 degrees. Pull the bread apart into small chunks. If you're more organized than me, you can chop the into perfect little cubes. I'm more into rustic croutons, though. Put them into a large bowl and pour the melted Earth Balance and garlic powder over them. Toss well to combine.


Pour the bread out onto a sheet pan lined with foil. Spread them out into a single layer and bake them in the oven, stirring occasionally, until they're nicely browned (about 15 minutes).

Make the salad: Heat up a grill or grill pan over medium heat. Starting from the stem, slice each romaine heart down the middle lengthwise. Brush the cut side with olive oil and sprinkle with salt. Grill them cut-side down until they're nicely charred, about 5-7 minutes. Work in batches, if you need to.


If you're using the vegan chicken, chop it into strips and throw it into the hot grill pan or saute it in a skillet until browned.

To assemble, put the romaine halves on a plate grilled-side up and top with the chicken, croutons, olives and dressing. Crack a little more pepper on top and serve.


Sunday, December 7, 2014

Mexican Chocolate Rice Krispy Treats


I feel a little guilty bringing you this sort of simple, no-brainer recipe after such a long absence. We moved to a new house and had internet issues, so that's slowed me down a bit. Now that we're settled in and up and running, I'll make up for lost time.

There are some familiar and much-loved foods that you think you'll never see again when you go vegan, and Rice Krispy treats were probably toward the top of my list. There are a few store-bought kinds that just don't taste quite right. The texture is there, but the flavor is off in a way that you can't quite put your finger on. When you think about it, there's really no reason to be buying them pre-made. In 30 minutes, you can have fresh, homemade ones that have your own little spin on them. Chocolate-dipped Rice Krispy treats are probably my favorite of the next-level kinds, but the possibilities are endless.

Vegan marshmallows have come a long way in just a few short years. Now there are quite a few varieties of good-quality marshmallows to choose from. I used Dandies brand for these, and they worked perfectly. The texture is right, the flavor is spot-on and they melt really well.

A note about the chocolate: I really love cinnamon. I used a ton of it in this chocolate because I wanted it to really come through. If you'd rather have it be more subtle, dial it back a bit and work up from there.


Ingredients
4 tbsp Earth Balance
4 cups of vegan marshmallows
6 cups of puffed rice cereal
1 bag of vegan chocolate chips (semi-sweet or dark)
1 tbsp cinnamon, or to taste

Grease up a 9x13 glass baking dish with cooking spray and set it near your stove.

In a large pot, melt the Earth Balance over medium-high heat. Add all the marshmallows and stir them around until they're well-coated. Keep them moving around and don't let the heat get too high. This will prevent them from scorching. They take a while to melt, but if you whip them around vigorously with a wooden spoon, it will happen. It takes about 5 minutes or so.


Add the cereal 2 cups at a time, stirring between each time to incorporate.


Once it's all in and well-incorporated, take it off the heat and scoop it all out into the baking dish. Use the spoon to smooth them out so the top is level. Place the dish into the freezer for 15 minutes.


While they're cooling, pour the bag of chocolate chips into a microwave-safe bowl. Microwave them for 30-40 seconds, take them out and stir them with a spoon. They should be softened up enough to start melting. Do another 10-20 seconds if not. Don't go more than a minute or so. Once a few of them are melty, stirring them will cause the others to melt.


Add the cinnamon. If you're worried about using a full tablespoon, just do a teaspoon at a time and taste test until you've got the right amount.

Pull the dish out of the freezer and use a sharp knife to cut out squares. Put them back into the freezer for another 2-3 minutes. Line a baking sheet with parchment paper and set it near your bowl of melted chocolate.

Take the dish back out of the freezer and pull out individual squares. Dip one end into the chocolate, making sure to coat all four sides well. Place them on the baking sheet to let the chocolate set.


Thursday, October 30, 2014

Chinese Honey-Hoisin Seitan Ribs


I know a lot of skeptical meat eaters. When I tell them that I made a pot roast or chicken parmesan that's vegan, they raise an eyebrow. When I tell them I made ribs that are vegan, both brows tend to go up. When they try these ribs, they're usually pretty shocked because the texture and flavor are right on. These things win over my meat-eating friends and family every time.

Normally, I slather these in a homemade barbecue sauce or braise them until they're tender. Lately I've been using a honey alternative that is out of this world and it got me thinking about honey-hoisin ribs instead. These are a nice combination of sticky, sweet and tangy.

The honey alternative is called Bee Free Honee and I can't recommend it highly enough. If you're in Seattle, you can find it at Vegan Haven or Central Market. Bee Free Honee is made from apples and it looks, pours and tastes just like honey. The only thing that gives it away is that there's a slight apple-y aftertaste. You could use agave nectar for this sauce, but it's not even in the ballpark of honey flavor. If you're wondering why honey isn't really vegan, you can find some good info here.

These ribs are very easy to make, so don't be intimidated by the final product. They take less than an hour and very little of that is "hands on" time.

Ingredients
For the ribs:

dry ingredients
2 cups vital wheat gluten
1/4 cup nutritional yeast
2 tbsp garbanzo flour
2 tsp garlic powder
2 tsp onion powder

wet ingredients
1 1/2 cup water
1/4 cup tamari
2 tbsp vegetable oil

For the sauce:
1/2 cup hoisin sauce
2 tbsp rice wine vinegar
4 tsp tamari
2 tsp sriracha
2/3 cup Bee Free Honee or agave nectar

green onions, sliced
2 tbsp sesame seeds


Preheat your oven to 350 degrees.

Make the ribs: In a large bowl, stir the dry ingredients until combined. In a medium bowl, stir the wet ingredients together. Add the wet to the dry and stir with a sturdy wooden spoon until combined. Don't get too aggressive or overwork the dough or the ribs will be tough. It should all come together pretty easily and look like this:


Spray a 9x13 glass baking dish with cooking spray. Put the ball of dough into the dish and knead it out toward the edges, making sure that it's being spread evenly. If some spots are thinner than others once it's spread, just work some over from a thicker spot. Once the dough is spread out evenly, score rib shapes into it with a sharp knife. One lengthwise and several others across, depending on how big you like them.


Brush the top of the dough with a little vegetable oil and put it into the oven for 30 minutes.

Make the sauce: While the ribs are cooking, combine all the sauce ingredients in a small bowl. Get a large sheet pan out and line it with aluminum foil.

Once the ribs have been cooking for 30 minutes, take them out of the oven and re-score the lines. You'll be taking them out of the baking dish and moving them to the pan, so feel free to actually cut the slab into 2 segments to make it easier to work with. Just split them along one of the lines. Turn your broiler on low.


Brush both sides of the ribs generously with the sauce and place them on the foil-lined baking sheet. Put the ribs into the oven and let them cook for 5-7 minutes, or until they start to char a bit and the sauce caramelizes. Once that happens, pull them out and flip them and cook for an additional 5-7 minutes.


Cut along the pre-scored lines and separate the seitan into rib shapes. Brush with a little more sauce and sprinkle on some sesame seeds and chopped green onions.

Monday, October 6, 2014

Carrot and Potato Stew with Lemon-Thyme Dumplings


I love this stew. It's easy and fun to make and always hits the spot, especially on a chilly fall or winter night. Our neighbor got a spot at Pike Place Market for his soda business and gave us some veggies from the market. This was the perfect dish for them. Look at these beauties:


Which reminds me: don't get stuck in the mindset that there has to be some kind of meat-type ingredient in order to make a stew. The potatoes and carrots, along with a thick broth, are more than enough to make this stew satisfying. Some seitan or field roast would be a perfectly fine addition, but I think you'll find that you won't need them.

Ingredients
For the stew:
2 tbsp olive oil
1/4 cup unbleached all-purpose flour
1 medium sweet onion, diced
3 celery stalks, diced
1 bunch carrots, peeled and sliced (about 1 1/2 cups after they're diced)
1 1/2 pounds Yukon Gold potatoes, chopped into small chunks
6 cups warm veggie stock
1 tsp salt
2 cloves of garlic, minced
1 tbsp tarragon
1 tbsp rosemary
1 tsp smoked paprika
Black pepper to taste

For the dumplings:
1 1/2 cups unbleached all-purpose flour
2 tsp baking powder
1 tbsp thyme, crushed between your fingers
1/2 tsp salt
3/4 cup unsweetened soy milk
2 tbsp lemon juice
2 tbsp olive oil

Make the stew: First, dice up your veggies and have them at the ready. You can put the potatoes, carrots and celery on a plate or in a bowl all together to save space. Leave the onions by themselves. In a large heavy-bottomed pot, heat the oil over medium heat. Once it shimmers, add the flour and stir it around in the oil, making sure it's absorbed completely. Stir the mixture around for about 3 minutes, until it's a little darker and smells kind of nutty.


Add the onions and the salt and stir them around to coat in the flour mixture. Sweat the onions over the heat, stirring pretty regularly, until they're nice and soft, about 5 minutes. Add the garlic and stir it around, cooking it for another 20-30 seconds.


Slowly pour in the veggie broth, stirring constantly with a whisk to make sure there are no lumps. Add the other vegetables and the seasonings and stir it all up. Put the lid onto the pot and turn the heat up to high. When it starts to boil, turn the heat back down enough to keep it at a nice simmer. Let it cook like this for about 20 minutes, stirring it around occasionally.


Make the dumplings: While the stew is simmering, combine your dry ingredients in a medium bowl. Add the liquid ingredients and stir them around. This won't be like pizza or bread dough, all dry and easy to handle. It should be sticky. Only add more flour if it's liquidy or runny (it shouldn't be).


Remove the lid and drop in large spoonfuls of dumpling dough directly into the stew. They'll sink and won't look like much, but trust me on this. Put the lid back on and leave it alone for 15 more minutes. Once you lift the lid, they'll go from looking small and sad to this:


Ladle the stew into some bowls, top with a couple of dumplings and enjoy!

Tuesday, September 16, 2014

Fried Green Tomato BLTs with Homemade Potato Chips


There's just a little summer left, so we have to make the most of it. I know, I know: Labor Day has come and gone. That may be the finish line for white pants, but officially, we have a little time left. Green tomatoes are all over Seattle right now, so I can think of no better way to use them than in this twist on an old classic. Look at these beauties:


Tempeh bacon can come in two forms: store-bought and homemade. I opted for the store-bought kind to save time, but if you want to go the homemade route, simply slice up some tempeh and marinate it all day or overnight in some soy sauce, liquid smoke and maple syrup. If that's not an option, don't sweat it. Tofurky can come to the rescue:


You can gussy this sandwich up any way you like. The most popular way is probably adding avocado. I wholeheartedly endorse this, I just didn't have any handy the night I made these. Something else I wholeheartedly endorse is a new brand of vegan mayo that's hit the store shelves recently:


This stuff is grand. It nails the mayo flavor and texture and it costs less. I've seen it at all the major grocery stores lately, even the ones that don't carry Vegenaise. It's right on the shelf next to the dairy mayo, which is smart.

Ingredients

For the BLTs:
2 green tomatoes
1 cup unsweetened soy milk
2 tsp apple cider vinegar
1 1/2 cups unbleached all-purpose flour, divided
1/2 cup cornmeal
1 tsp smoked paprika
1/4 tsp sea salt
1/4 tsp cayenne pepper (optional)
veggie oil for frying


1 package tempeh bacon (or other vegan bacon)
lettuce
vegan mayo (any flavor)
good bread


For the chips:
2-3 medium russet potatoes
olive oil
sea salt


Make the chips: Preheat your oven to 375 degrees. Using a mandolin or slicer attachment for a mixer, slice the potatoes thin. Lay them out in an single layer on 2 parchment-lined sheet pans. Brush them with a little olive oil and sprinkle them with sea salt and any other spices or herbs.


Put the sheet pans in the oven on the lower rack and set your timer for 10 minutes. When it goes off, pull them out and flip them to the other side, then put them back in for another 8-10 minutes. Watch them closely after 8 minutes so they don't burn. If they're browning too fast for your taste at the 10 minute mark, move them to the top rack and leave them in for another 5 minutes after flipping. Once they're done, take them out and let them cool.


Make the bacon and fried green tomatoes: In a skillet, heat about a 1/2 inch of veggie oil over medium-high heat. Carefully put the tempeh bacon into the oil and cook for 4-5 minutes, flipping and repeating with the other side. Remove the browned tempeh slices to a plate lined with a paper towel.


You'll be using the same basic that's called for in the onion ring post. That means three bowls: one with flour, one with milk and a bowl of seasoning. Put one cup of flour in the first bowl. Mix the milk and apple cider vinegar in the second bowl until it's thick and then combine the rest of the ingredients in the third bowl. Dust each tomato in flour, then dunk in the milk and then toss it in the flour/cornmeal mixture. Set the coated tomatoes aside so they're ready to go. Repeat the same frying process for the tomatoes, letting them cook 3-4 minutes per side, until golden.


Toast the bread and spread with mayo and any other condiments you desire. Build your sandwich with plenty of the bacon, lettuce and fried green tomatoes. It's as easy as...

One:


Two:


Three: